I want to start this article with a disclaimer. What follows is not a tutorial or a guide, do what you want, but do not blame me if your fried your Intel NUC (they do not taste good).
When it comes to hardware and datacenters, I am not an expert. I was born and raised in the cloud, and recently, I joined Equinix and Metal (previously PacketHost). That’s why my interest changed, and I now have a disassembled NUC and a multimeter on my desk.
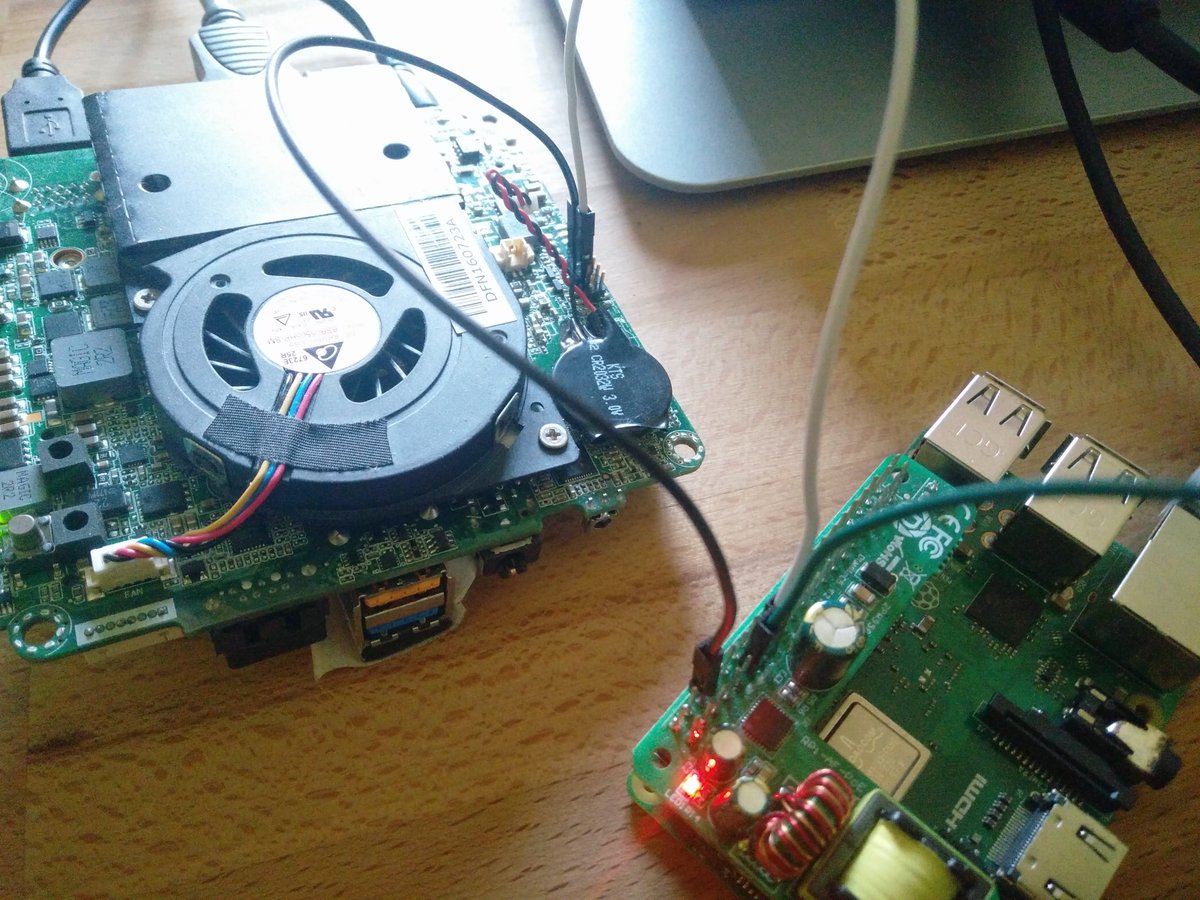
If you don’t know the origin of that PCB, I wrote a piece about my homelab for the Equinix Metal blog: “Building an Ephemeral Homelab.”
Long story short, almost one year ago, straight after joining Equinix Metal, I got a couple of NUCs and Invidia Jetsons to play with, fully cabled in a 1U brick. Cool, but I have to admin only helpful for experimentation. It was cheap and the boards themself are old. But this is everything I need, something I can break without feeling too bad.
When it comes to fully flagged servers, you quickly learned that they are made of building blocks when an essential one is the board management console (BMC). Think about that as a small and low-consuming PC that manages the big brother, the actual server. When it comes to servers, you know they are loud, consuming a lot of power. That’s why you have a BMC that has the only responsibility to manage the expensive server. It can power control it, switching it on, off, and monitoring its status with metrics like volt consume, temperature, and so on. It can even select the boot device, for example. It is handy if you want to enter PXE mode, for example, to manage your server without touching it.
The BMC is wired to the server; you don’t have to power it separately; usually, you only have to hook it with an RJ45 to a switch. Extremely functional because those who have access to the BMC can take control of the actual server; it is an excellent idea to place the NIC in a dedicated VLAN.
Time to hack
My homelab arrived cabled with a relay controllable from an outside board like an Arduino or a Raspberry Pi. Switching on or off the relay cuts the power brutally, almost like directly pulling the board’s power cable off.
NUC does not have a BMC and does not consume much, so there is no point in having another computer controlling them, but hey, this is my home lab, and we are after something here.
I downloaded my board’s schematic a few months ago, and from time to time, I look at it for inspiration. I studied electronics at high school, and Arduino got invented in my region, but I don’t think it counts.
I want to switch on and off my boards properly without leaving my desk because I am lazy. I want to use a Raspberry PI for this job because I can write code in any language I know. Spoiler alert for this prototype I have used ~5 lines of Bash.
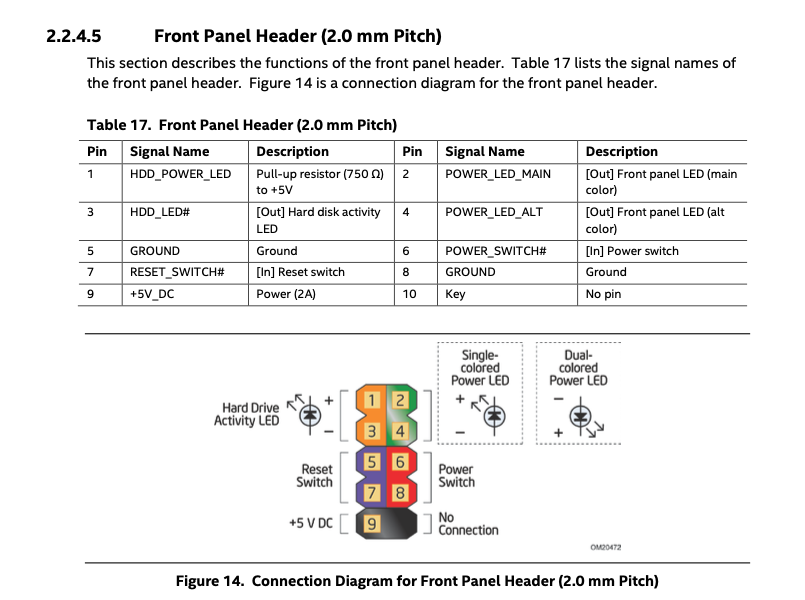
— Picture front panel schematics —
During one of many rounds of randomly reading the table of contents, I saw a Front Panel Header exposed from the NUC that says: “Power/Sleep LED Header”. It looks like there is a way to connect a LED to the NUC to see its status, fun! Nothing complicated: 1 the board is on, 0 the board is off. The LED can be replaced with a GPIO from the Raspberry PI (I used GPIO22) and hooked to a few BASH lines (as a prototype) to read the actual value from the NUC. I used this guide, “Bash Control of GPIO Ports.” I used tmux so I can leave it running in the background:
#!/bin/bash

tmux new-session -d -s power\_status
tmux send-keys "watch -n 1 'cat /sys/class/gpio/gpio22/value >> /tmp/current\_power\_status'" C-m
tmux detach -s power\_status
Now that the first mini-circuit is done and I am a bit more confident, I kept reading: “Power Switch Header.”
Pins 6 and 8 can be connected to a front panel momentary-contact power switch. The switch must pull the SW_ON# pin to ground for at least 50 ms to signal the power supply to switch on or off.
This sounds easy; I cabled PIN 6 from the NUC to GPIO 17 in the RPI and PIN 8 to ground, and with two bash scripts, I figured it all out!
$ root@raspberrypi:~/power\_swtich# ls
log.sh poweroff.sh poweron.sh

$ root@raspberrypi:~/power\_swtich# cat poweroff.sh
#!/bin/bash
echo "0" > /sys/class/gpio/gpio17/value

$ root@raspberrypi:~/power\_swtich# cat poweron.sh
#!/bin/bash
echo "1" > /sys/class/gpio/gpio17/value
sleep 0.2
echo "0" > /sys/class/gpio/gpio17/value
sleep 0.2
echo "1" > /sys/class/gpio/gpio17/value
Power the Raspberry PI
Half of myself likes the idea of getting a Raspberry PI or equivalent for each NUC, pretending that it is a BMC (I have other things I want to do with it, more at the end of the article). Either way, I like the idea to power the Raspberry PI from the NUC itself to save a power supplier and a cable. If you carefully looked at the front panel picture, you probably noticed that PIN 9 is a +5V_DC (2A), just enough to power an RPI via GPIO. But you need to know that GPIO unlikely the USB one does not implement any safety protection technique. If you supply an incorrect voltage, the RPI will burn.
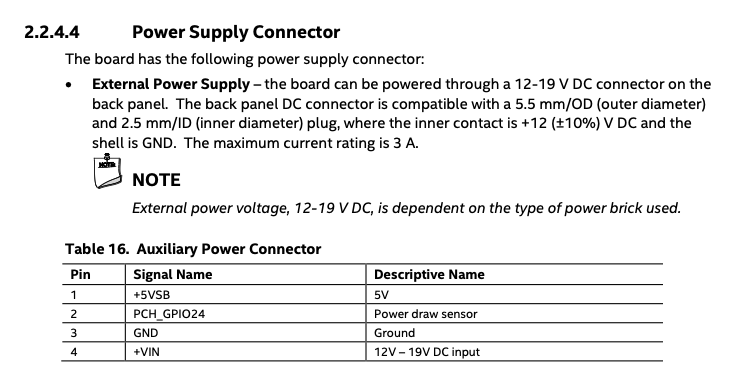
Anyway, PIN 9 is not what I am looking for because it goes up to +5 V only when the NUC is on. We want to get the RPI powered on even when the NUC is off (but plugged with the power supply).
The NUC has a header called: “Auxiliary power connector” that does just what I need! I hooked it all up, and we have power.
Conclusion
I can’t tell if this is or will never be a BMC, but I quite like where this is going, and I had fun. Short term, I can hook more NUCs to the same RPI and play with it. I can re-write the bash scripts you saw using some other languages exposing something like an HTTP API that I can interact with programmatically.
But I am after something better that I am not sure I can figure out. There is something else. I want to visualize output from the NUC. With Tinkerbell, I already have some control over the machine lifecycle because the NUC is capable of PXE booting. I can inject an in-memory operating system (Linux) and SSH into a NUC even if it does not have an operating system installed. But I want more; I want to look at the BIOS and things like that. An “easy” solution is the HDMI dongle. I can get an HDMI video capture, hook it up to the RPI and forward the NUC output with VNC or something like that; I can do something similar to forward what I type with a keyboard. A better solution is to use a serial console. Unfortunately, my board does not expose it. Joel, one of my colleagues at Equinix Metal, told me that my CPU most likely has it, and he is correct (accordingly with the CPU schematic), but the board does not have a header that I can use. But this is a story for a next article (if we will figure it out).