I recently joined Packet, a company acquired by Equinix, finally after 7 years working with cloud computing I can see how they look like from the other side!
Spoiler alert: clouds are made of servers
As a first task I had to revamp the kubernetes cluster-api implementation, moving it from v1alpha1 to v1alpha3. Kind of cool and in a domain I know very well. We tagged the first release and I can’t wait to see how it will be used. I got some meetups and webinars planned about it, so stay in touch on twitter to know more about it.
Anyway, one of the topics I am curious about is hardware automation. The idea to get up and running, in a repeatable and autonomous way a piece of inanimate metal well known as rack, switch, server is a topic I never touched and I would like to know more! Obviously, this is only one of the articles I will write about the topic. Mainly because there is much to learn.
As you can image when we buy a server it does not do much, it’s great to keep your door open, and as a table. It has to be configured, in our case customers can do it via API, it means there is some code involved! I want to know more!!
For sure there are a couple of things that you have to do manually, assemble the sever, power it on, plug the ethernet cable in, pick the right location and things like that.
But as you can imagine it comes without operating system, even more complicated to install because the customers can select the one they like most, or even push their own one. This is for sure something that has to be done magically, I doubt we have people running with USB stick in a datacenter installing operating systems.

One of the things that happen when booting a laptop or server is the bootloader. The one that requires a master skill to get in because there is a timeout, and I never know what to press! I have to be honest I thought they were pretty static and not that fun.
BUT, there are smart boot-loaders! We know what smart means does days: internet! In practice there is a bootloader capable of booting not from USB, not from disk but from the internet.
Usually a private network but it is not mandatory, and we spend the last couple
of years doing curl something.com | bash. The bootloader downloads a
kernet, the initrd and it will boot an operating system. It is like having a
USB stick that starts the live installation of Ubuntu, there is a lot more after
that because we have to persist the installation on disk, format them and so on.
In this article I will show you at first how to get to something that looks like like the installation wizard for ubuntu, and also how to automate the installation via preseed.
The bootloader is called PXE, and the new generation I used is called iPXE.
The cool things about PXE/iPXE is that you can chain scripts from one to another. Graham Christensen told me that the main goal when you work with PXE is to escape from it and get to iPXE, that is way cooler. Time for a recap:
- The machine starts and enters PXE
- PXE download and chains iPXE in this way we are on iPXE bootload
- From iPXE you can download kernel, initrd and boot the OS in RAM.
IPXE supports different ways to download what it needs from the internet, the one I used so far are TFTP and HTTP.
What is this PXE/iPXE?
Such a nice question, I had the same one few days ago. A couple of links:
Roughly you can think about iPXE as a shell that has a bunch of commands like:
- dhcp: to require an IP from a DHCP server and configures the network interface
- route: to figure out if the network interface is configured (if it has an IP already)
- chain: gets an argument (a URL) and it executes the content, it is a good way to pass scripts
- You can see variables
set name value - kernet: downloads the kernel from a source and load it
- initrd: download the init ramdisk
- boot: triggers the boot
And many more that I did not use yet but docs lists them.
It also has support for building a menu like this one:

The image comes from netboot.xyz as you can see from their website is a project that simplify the process of installing a lot of different operating systems via PXE. I started with it at first for my experiments. Obviously menus and automations does not play nice together but in the process of learning I took this extra step.
Hello world
To give you some context this is the script I used to start the installation wizard for Ubuntu:
#!ipxe
dhcp net0

set base-url http://archive.ubuntu.com/ubuntu/dists/focal/main/installer-amd64/current/legacy-images/netboot/ubuntu-installer/amd64/
kernel ${base-url}/linux console=ttyS1,115200n8
initrd ${base-url}/initrd.gz
boot
I hope it looks familiar, some code at least. In order to
reach the internet you need an IP, and to get one if you are lazy like me is to
use a DHCP (the alternative is to set one statically). The first command does that, asks the DHCP an IP for the network
interface net0.
When the IP is set, iPXE reachs ubuntu.com to get the kernel and the initrd.
Everything I need to boot an OS in RAM.
let’s try
I am using Packet for my tests because it serves the low
level capabilities I need, it supports the server creation without OS and with
iPXE. You can register and do it yourself, gophernetes is a coupon that will
give you 30$ credit.
When you request a device (a server) on Packet you can select the operating
system, we don’t need to do it, so you can select Custom iPXE because we are
going to install it ourselves.

There are two ways we can inject out script to iPXE in order to teach the server what to do when it boot, first one is giving a URL (I use a gist (raw link)), or via user data. The script I used is the one pasted above. You can create a gist and paste the link in “iPXE Script URL” or you can use the user data, as I am doing right now.

As soon as the machine starts you can click on its name to enter the get its details and you get a ssh into the “Out-of-Band Console” console:

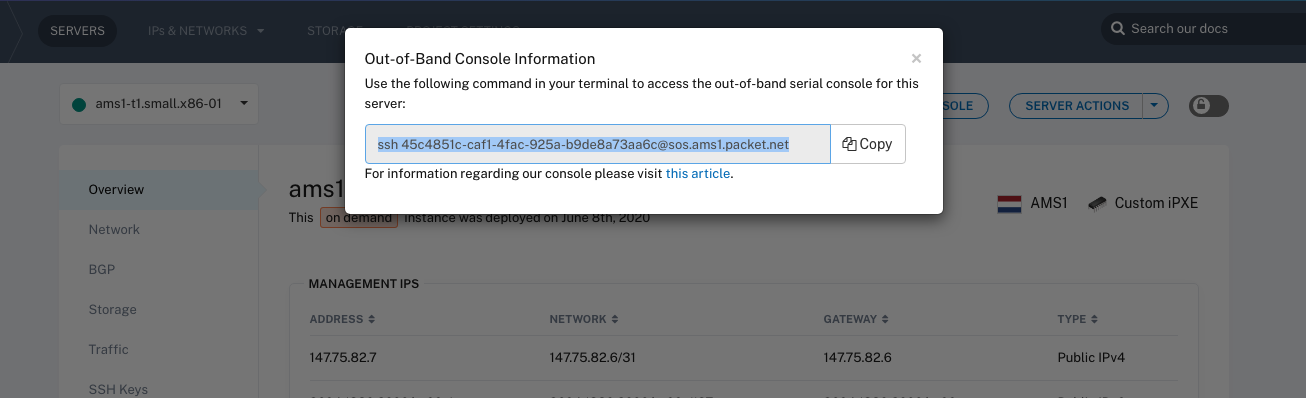
ALERT: if you are doing this activity, remember to enable OpenSSH when you follow the installation wizard otherwise you won’t be able to SSH in the server at the end!
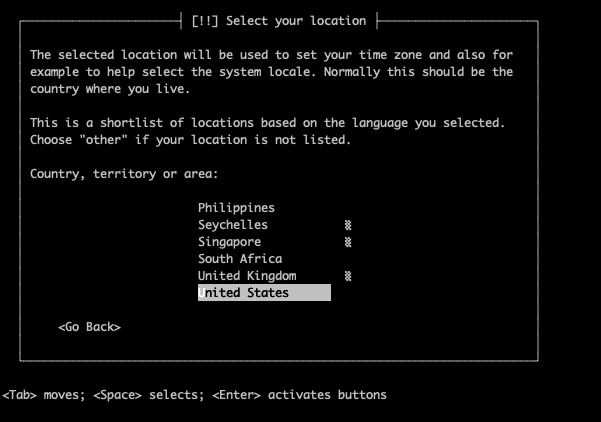
When deploying the server the code you passed gets chained from the Packet iPXE. And you should see the Ubuntu wizard ready for you:
At the end of the wizard you will get a persisted operating system in the server itself, it will survive the reboot and it will be just as any other server you used in the past, but better because you know how you installed the OS! Get its IP and ssh in!
Preseed
Debin like operating system, like Ubuntu support a technology called preseed, it practice is a text file that contains the answers for all the questions the Ubuntu wizard makes.
In this way no point and click is required. I put together a file here and I uploaded it as a gist:
#### Contents of the preconfiguration file (for stretch)
### Localization
# Preseeding only locale sets language, country and locale.
d-i debian-installer/locale string en_US.UTF-8
d-i localechooser/supported-locales multiselect en_US.UTF-8
d-i console-setup/ask_detect boolean false
d-i keyboard-configuration/xkb-keymap select GB

# Keyboard selection.
# Disable automatic (interactive) keymap detection.
d-i console-setup/ask_detect boolean false
d-i keyboard-configuration/xkb-keymap select us

# netcfg will choose an interface that has link if possible. This makes it
# skip displaying a list if there is more than one interface.
d-i netcfg/choose_interface select auto

# Any hostname and domain names assigned from dhcp take precedence over
# values set here. However, setting the values still prevents the questions
# from being shown, even if values come from dhcp.
d-i netcfg/get_hostname string unassigned-hostname
d-i netcfg/get_domain string unassigned-domain

# Disable that annoying WEP key dialog.
d-i netcfg/wireless_wep string

### Mirror settings
d-i mirror/country string manual
d-i mirror/http/hostname string archive.ubuntu.com
d-i mirror/http/directory string /ubuntu
d-i mirror/http/proxy string

# Root password, either in clear text
d-i passwd/root-password password rootroot
#d-i passwd/root-password-again password rootroot
# or encrypted using a crypt(3)  hash.
#d-i passwd/root-password-crypted password [crypt(3) hash]

# To create a normal user account.
d-i passwd/user-fullname string yay
d-i passwd/username string yay
# Normal user's password, either in clear text
d-i passwd/user-password password norootnoroot
d-i passwd/user-password-again password norootnoroot

# Set to true if you want to encrypt the first user's home directory.
d-i user-setup/encrypt-home boolean false

### Clock and time zone setup
# Controls whether or not the hardware clock is set to UTC.
d-i clock-setup/utc boolean true

# You may set this to any valid setting for $TZ; see the contents of
# /usr/share/zoneinfo/ for valid values.
d-i time/zone string US/Eastern

# Controls whether to use NTP to set the clock during the install
d-i clock-setup/ntp boolean true
# LG provided NTP, should be replaced!
d-i clock-setup/ntp-server string ntp.ubuntu.com

### Partitioning
d-i preseed/early_command string umount /media || true
d-i partman-auto/method string lvm
d-i partman-auto-lvm/guided_size string max
d-i partman-lvm/device_remove_lvm boolean true
d-i partman-lvm/confirm boolean true
d-i partman-lvm/confirm_nooverwrite boolean true
d-i partman-auto-lvm/new_vg_name string main
d-i partman-md/device_remove_md boolean true
d-i partman-md/confirm boolean true
d-i partman-partitioning/confirm_write_new_label boolean true
d-i partman/choose_partition select finish
d-i partman/confirm boolean true
d-i partman/confirm_nooverwrite boolean true
d-i partman-basicmethods/method_only boolean false

### Partitioning
d-i partman-auto/method string lvm
d-i partman-lvm/device_remove_lvm boolean true
d-i partman-lvm/confirm boolean true
d-i partman-lvm/confirm_nooverwrite boolean true

### Package selection
tasksel tasksel/first multiselect ubuntu-desktop

# Individual additional packages to install
d-i pkgsel/include string openssh-server build-essential
# Whether to upgrade packages after debootstrap.
# Allowed values: none, safe-upgrade, full-upgrade
d-i pkgsel/upgrade select full-upgrade

d-i pkgsel/update-policy select none

# Individual additional packages to install
d-i pkgsel/include string openssh-server \
    vim \
    git \
    tmux \
    build-essential \
    telnet \
    wget \
    curl

# This is fairly safe to set, it makes grub install automatically to the MBR
# if no other operating system is detected on the machine.
d-i grub-installer/only_debian boolean true

# This one makes grub-installer install to the MBR if it also finds some other
# OS, which is less safe as it might not be able to boot that other OS.
d-i grub-installer/with_other_os boolean true

# Avoid that last message about the install being complete.
d-i finish-install/reboot_in_progress note
It is a bit weird but if you are familiar with the Ubuntu installation process I am sure you can spot some similarity.
At this point we have to pass some cmdline arguments to the kernel in order to
have it downloading the preseed file from a raw gist and to tell the kernel that
the installation is automatic:
#!ipxe
dhcp net0

set base-url http://archive.ubuntu.com/ubuntu/dists/focal/main/installer-amd64/current/legacy-images/netboot/ubuntu-installer/amd64/
set preseed-url https://gist.githubusercontent.com/gianarb/acea1ca5b73a318fd74cbb002cae21f3/raw/76e5d036ee28c485cc7cf42a317c99e678f08a6c/ubuntu.preseed
kernel ${base-url}/linux console=ttyS1,115200n8 auto=true fb=false priority=critical preseed/locale=en_GB url=${preseed-url} DEBCONF_DEBUG=5
initrd ${base-url}/initrd.gz
boot
The mechanism is the same as before, you can create a gist and link it during the server creation or you can paste this as cloud init.
At this point you can connect to the Out of Band console via ssh and the
installation wizard will look like a movie! When the process is over the server
reboots and you will be able to SSH in using username: yay, password
norootnoroot. If you are looking for the root password have a look at the
preseed file, the answer is there!
Preseed is probably not what you want at the end, but it is an easy enough way
to get to a persisted OS. It does a lot runtime, by consequence it is time
consuming and it can be flaky when reaching the network.
Dan pointed me to other ways to do it using
raw images but probably I will experiment moving forward.
Conclusion
That’s it, this is a layer I am not familiar with Packet has an open source project called Tinkerbell, that does bare metal provisioning.
I want to know what it does under the hood! In practice is an open source version of the provisioner used internally to set up servers. We are moving towards to it as well!
A lot of the underline technologies like preseed, PXE are 20 years old, and as I like to say: “I have a lot of new things to learn from the 80s”.
Don’t know where this will bring me but I think the next articles will look like:
- How to get a iPXE server to serve my own kernel, initrd
- How to get a set of RPIs provisioned
Point me to the right direction or if you are curious to know more about this topic.